install the thermostat (test if necessary), the radiator hoses and then refill the cooling system.
(5) Use demineralised or rainwater when refilling the cooling system, adding the correct amount of corrosion inhibitor or antifreeze.
(6) To ensure engine block, cylinder head and heater are free from air locks, remove the temperature sender unit and fill cooling system until water flows from the sender unit orifice. Replace sender unit and complete filling the system, including the coolant recovery reservoir where fitted. Ensure all leaves, dust, insects, etc. are cleaned from the radiator core.
Coolant Temperature Switch (Models with E.L.B.)
(1) Connect one lead of an ohmmeter to a good ground on engine.
(2) Connect other lead to terminal of coolant switch and check for continuity. If engine is cold, continuity should be present. If coolant temperature is above 65°C (150°F) the reading should show no continuity. If it fails either test, replace the switch.
Power Brake Booster Hose
Inspect hose for evidence of heat and mechanical dam age, hard and brittle rubber, tears, cuts, abrasion and ex cessive swelling.
Inspect hose clamps to make sure they are secure and no leaks are present.
Refrigerant Level (air-conditioned models)
The refrigerant level is checked at the receiver drier on the right hand side fender splash shield.
The check consists of viewing the sight glass in the receiver/drier with the air conditioning controls set on Max A.C.
NOTE: While the engine hood is up, hot air from the engine compartment should be deflected away from the cowl air inlet. If not the refrigerant could foam, even when the system is fully charged.
Freedom of foam bubbles in the sight glass indicates that the refrigerant level is within specifications.
Should bubbles be present, the refrigerant level is low and a complete test for leaks should be carried out before refrigerant is added to the system.
Details for testing and servicing air conditioning are included in Group 24.
CAUTION: DO NOT attempt service operations on air conditioning components without first refer ing to Group 24 Heating and Air conditioning.
I i
I
UNDER VEHICLE OPERATIONS Engine Oil and Filter Changes
Regular oil changing is essential if engine life is not to be considerably curtailed.
Under normal operating conditions (i.e. good roads in temperate climates), the engine oil and filter should be renewed in accordance with the Lubrication and Mainte nance Schedule. However, there are certain instances where this should be done more frequently, some of these are as follows:
\....ri te
1 - 2 - 12
(1) Consistent stop/start driving or running at con tinuallow engine speeds.
(2) Operating in cold weather, especially when appre-
ciable idling is involved.
| (3) Short trips of less than 15 km. | -. |
(4) Operating in extremely dusty areas.
(5) When 4 months has expired before the specified kilometres have been reached.
Drain and Refill
Draining the oil is best done when the engine is warm as the oil will flow more easily.
IMPORTANT: Always use fresh lubricant of the recommended grade for refilling purposes.
Removing Oil Filter
(1) Unscrew filter and discard.
(2) Wipe clean the filter base on the engine block and inspect the gasket contact surface and attaching threads. (3) Lubricate the gasket and threads of the new filter with clean engine oil.
On 8 cylinder engines, remove the filter adapter from the old filter or filter base and torque into the new filter at 27 Nm (20 lbs. ft.). A drain back valve in the filter adapter prevents oil spills at the next filter change.
(4) Install the filter by hand until finger tight.
IMPORTANT: Do not use tools for fitting the filter. (5) Tighten the filter, by hand, the number of turns
indicated on the replacement filter so that an effective oil tight seal is obtained. On ~ cylinder models where the filter and adapter are fitted as an assembly as detailed in para (3), tighten filter only one half turn.
(6) Run the engine for a short time and check for leaks.
(7) The filter holds a quantity of oil and the level in the oil pan should be checked and topped up if necessary.
Manual Transmission
With the vehicle standing on a level surface; clean the area around the filler plug. Remove plug, the lubricant level should be up to the bottom of the filler plug hole. Top up with the specified lubricant if necessary and re place plug.
NOTE: If top-up is necessary, inspect an seals for . leakage.
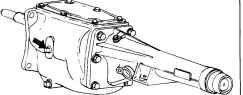
Fig. 20-3 speed manual transmission level/filler plug
REV. OCT. '78