hydraulic pressure to be applied to the rear circuit. An increase in brake pedal travel and effort will be experienced.
BRAKE MASTER CYLINDER Removal
(1) Disconnect the brake tubes from the master cylinder and install plugs in the outlet holes.
NOTE: Position a clean absorbent cloth to prevent any brake fluid leaking onto the vehicle paint. work during this operation.
(2) Remove the nuts retaining the master cylinder to the booster and loosen the bottom master cylinder support bolt.
(3) Disconnect the warning light switch lead and remove the master cylinder.
Installation
(1) Prior to installing the master cylinder it is advisable to "bleed" the master cylinder of air bubbles as described in Section 1.
5 - 3A - 3
(2) Position the master cylinder to the booster and loosely install the retaining nuts.
(3) Remove the plugs from the outlet ports and connect the brake tubes to the master cylinder.
(4) Tighten the master cylinder retaining nuts, support bracket bolt and brake tube fittings to the specified torque.
(5) Bleed the brake system as described in section 1 "Bleeding Hydraulic Brake System".
MASTER CYLINDER OVERHAUL Disassembly
(1) Clean the outside of the master cylinder and remove reservoir cap. Pour out any brake fluid that remains in the cylinder and discard the old brake fluid.
(2) Hold the cylinder by mounting flange in a vice equipped with soft jaws.
(3) Unscrew and remove the nut and washer located inside the plastic reservoir.
(4) Separate the plastic reservoir from the master cylinder and remove the rubber seal grommets from the body.

RESERVOIR CAP
RESERVOIR
RESERVOIR
ATTACHING NUT----...:l
| AND SEAL | ~ |
RESERVOIR GROMMET
SPOOL VALV~ ~
PISTON STOP SPACER - ~ D!!!!:;>., STATION WAGON WITH ~ PBR SLIDING HEAD CALIPERS
PRIMARY PISTON
RETAINER PLATE
.~
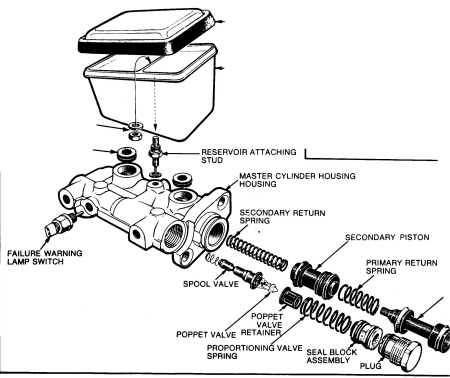
Fig. 2-Disassembled view of master cylinder REV. OCT. '78